
Setting up Templates
Templates are used to map classified parts to print parameters, which are needed to print those parts.
A background task within Funnel, refered to as the scheduler, uses the templates to assign parts to candidate print jobs. The assignment process is facilitated by data configured within the templates, part sizes and classification, printer availability, and printer build volumes. The scheduler runs for approximately 30 seconds every 2.5 minutes.
Only users with Admin or Owner roles should be able to create/edit templates.
To create templates have a user with an appropriate role navigate to the manage templates page; click the Manage icon in the left navigation bar, then select the Template tab. Now click the Create button at the top right of the screen to see:

Red outlined fieds are required, pressing Create while there is a red outlined field will do nothing and the dialogue will remain on the screen.
- Fast Print Mode (On by Default): This mode optimises print parameters to minimize printing time.
- Separation Detect (Off by Default): Adjusts parameters to detect potential separation. May shorten print time but can increase failed prints. Use with care.
Most fields are self explanatory but some hints on how to set them up are below:
-
The Associated Part Type tells you what part will be uploaded to this template.
You can associate the same part to multiple templates. When you do this Funnel will use the first template it finds with this part, however, you can change the template on that part from the Inbox page under the Review tab by selecting the part and selecting Template from the controls that appear.
- You cannot select a Thickness till a Material has been selected.
-
The Material choices shown are the materials that have previously been added to Funnel. At the bottom of the list there is an option to "Add more".
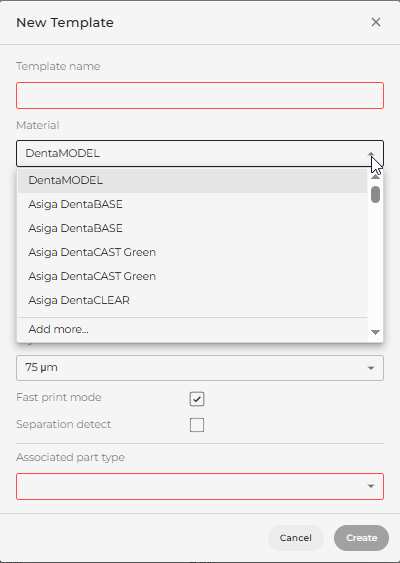
Add More materials Selecting the "Add more" option moves you to the Materials Dialogue where you can add new materials. See section on Setting up Materials for details on adding materials to Funnel. Once a new material is added you are returned to this dialog to complete the template
Templates can also be updated, this will only affect future parts added to the Funnel. Existing parts that already utilise the template will be unaffected by the update.
Default Template
If a part type is associated with multiple templates when a part is classified as that part type the default Template will be assigned to it. If you wish to assign one of the other Templates you can:
- in the Inbox/To Review section select the part
- click the Template button in the Action Bar. It will show all the templates that can be applied to that part.
- Select the template you wish to apply

Editing Templates
If you need to change an existing template you must:
- select the Manage Icon in the Navigation Bar
- select the Templates tab
- select the template that you wish to edit
- select Edit from the Action bar to bring up the edit dialogue

After making the required edits to the template press "Update" to save the changes and "Cancel" to discard the changes.
If you have pressed "Update" and there are existing provisional print jobs that use that template you will be shown a warning indicating the amount of rework that the system will need to do if the change is applied.

Updating a template that is in use causes those jobs that are using it to be discarded and all the parts in them to be requeued. those parts will be re added at the end of the print queues, unless they are priority parts. The warning is given to make sure the User is aware of the consequences before applying the change. Pressing "OK" will apply the change and the affected parts requeued, pressing "Cancel" will discard the changes entirely leaving all jobs unchanged.
If there are no provisional jobs using the template, and 'Update" was pressed the change is applied immediately.
Setting the Default Template for a part
When a part is linked to multiple templates one of them must be the default. The default template for a part is shown on the parts list of the template.

If the template is the default for a part, in the parts list, there will be a tick in the checkbox in the row showing the part.
If you want to set the template to be the default of a part you can tick the checkbox in the row showing the part. This changes the default for that part to the current template and all future uploads of that part will be assigned this template, by default.
You cannot "Untick" a checkbox to stop the template being the default, because the syatem cannot know which other template, associated with that part, to make the new default. You must explicitly select the new default.
Note: Changing the default template has no effect on existing provisional jobs, so if this is the only change made it can be applied immediately once "Update" is pressed.
| << Prev |